· 12 minute read

React Essentials I: How to Create Your First App
· · 11 minute read
Introduction
React is the most popular front-end framework1 for building web applications. Whether you want to turn your big idea into the next unicorn app or wish to boost your front-end development career, React is the perfect framework to master.
This article is aimed at beginners who are starting their React journey. I’ll guide you step-by-step in creating your very first React app.
Here’s what we’ll accomplish today:
- Set up node.js - a prerequisite for React development.
- Create a new React app using Vite.
- A Tour of the React app code structure.
- Build and run the app locally.
- Create and use reusable components.
- Introduce React Developer Tools.
Let’s get started!
Install or Upgrade Node.js
You’ll need Node.js and npm to build the React application locally. Let’s check if you have Node.js already installed by using the below command:
Terminal
# Check the node.js version
node -v
If you get an error or the node version installed on your machine is lower than 18,2 install the latest version by following the directions on the Node.js download page.
Once installed, check the versions for both Node.js and npm:
Terminal
# Check the node.js version again
node -vv20.10.0Terminal
npm -v 10.2.5You can move to the next step if you see the above or higher versions!
Create React App Using Vite
Vite is a powerful build tool that helps developers create fast and lightweight web applications. It provides pre-built templates to create apps using a variety of frameworks.
Let’s create our first app, react-from-scratch, using Vite and its react template:
Terminal
# Go to the directory where you want to create the app
cd ~/learn/react/
# Use Vite to create a new app named 'react-from-scratch'
# Use Vite's react template
npm create vite@latest react-from-scratch -- --template react
Press y (yes) if it asks you to install a package like below:
Need to install the following packages: create-vite@5.1.0 Ok to proceed? (y) y
Scaffolding project in /home/learn/react/react-from-scratch…
Done. Now run:
cd react-from-scratch npm install npm run dev
Vite will generate the new directory react-from-scratch with all the necessary code and files for our React app. Let’s see what’s inside this directory:
Terminal
# Print the contents of the top-level app directory
# react-from-scratch using the "tree" command
# If you're on Windows, add "/f" at the end of the command
tree react-from-scratch
react-from-scratch ├── index.html ├── package.json ├── public │ └── vite.svg ├── README.md ├── src │ ├── App.css │ ├── App.jsx │ ├── assets │ │ └── react.svg │ ├── index.css │ └── main.jsx └── vite.config.js
Explore the Generated Codebase
Let’s review some of the essential files generated by Vite.
package.json
{
  "name": "react-from-scratch",
  "private": true,
  "version": "0.0.0",
  "type": "module",
  "scripts": {
    "dev": "vite",
    "build": "vite build",
    "lint": "eslint . --ext js,jsx --report-unused-disable-directives --max-warnings 0",
    "preview": "vite preview"
  },
  "dependencies": {
    "react": "^18.2.0",
    "react-dom": "^18.2.0"
  },
  "devDependencies": {
    "@types/react": "^18.2.43",
    "@types/react-dom": "^18.2.17",
    "@vitejs/plugin-react": "^4.2.1",
    "eslint": "^8.55.0",
    "eslint-plugin-react": "^7.33.2",
    "eslint-plugin-react-hooks": "^4.6.0",
    "eslint-plugin-react-refresh": "^0.4.5",
    "vite": "^5.0.8"
  }
}
The package.json file serves these primary purposes:
- Store the app metadata, such as the app name and version.
- The scripts to run the development server, build the app, etc.
- Maintain lists of required packages:
index.html
<!doctype html>
<html lang="en">
  <head>
    <meta charset="UTF-8" />
    <link rel="icon" type="image/svg+xml" href="/vite.svg" />
    <meta name="viewport" content="width=device-width, initial-scale=1.0" />
    <title>Vite + React</title>
  </head>
  <body>
    <div id="root"></div>
    <script type="module" src="/src/main.jsx"></script>
  </body>
</html>
The file index.html is the entry point for our React app. The browser loads this file to start the app.
Notice two important things:
- It has a div with the id set to root.
- It includes the script /src/main.jsx. This script plays a crucial role, as we’ll see below.
src/main.jsx
import React from 'react'
import ReactDOM from 'react-dom/client'
import App from './App.jsx'
import './index.css'

ReactDOM.createRoot(document.getElementById('root')).render(
  <React.StrictMode>
    <App />
  </React.StrictMode>,
)
The file src/main.jsx contains code to initialize and render the React app. Here’s what it does:
- Loads the React libraries (lines 1 & 2)
- Imports the component App and renders it in the div with id of root. Recall that this div was part of the file above (index.html)
- Includes index.css (line 4). The styles defined in this CSS file will be available to all the components in our app.
src/App.jsx
import { useState } from 'react'
import reactLogo from './assets/react.svg'
import viteLogo from '/vite.svg'
import './App.css'

function App() {
  const [count, setCount] = useState(0)

  return (
    <>
      <div>
        <a href="https://vitejs.dev" target="_blank">
          <img src={viteLogo} className="logo" alt="Vite logo" />
        </a>
        <a href="https://react.dev" target="_blank">
          <img src={reactLogo} className="logo react" alt="React logo" />
        </a>
      </div>
      <h1>Vite + React</h1>
      <div className="card">
        <button onClick={() => setCount((count) => count + 1)}>
          count is {count}
        </button>
        <p>Edit <code>src/App.jsx</code> and save to test HMR</p>
      </div>
      <p className="read-the-docs">
        Click on the Vite and React logos to learn more
      </p>
    </>
  )
}

export default App
The file src/App.jsx is the final piece of the puzzle. It is the top-level component where we’ll make our changes.
Notice that src/App.jsx returns code that looks like HTML (lines 10-29). It’s not pure HTML, though - you can embed JavaScript code by wrapping it in curly brackets. See the highlighted code above as an example.
Such code that contains both HTML elements and Javascript is called JSX. We’ll cover JSX in greater detail in a later article.
Also note that src/App.jsx imports src/App.css. Styles defined in this CSS file will apply to src/App.jsx and its children components.
Static Files
Your app may need static resources such as images, fonts, JSON data files, etc. You can include these files in any of these two directories:
- src/assets/: The files in this directory will go through the build process and become part of the application bundle.
- public/: Any files in this directory will not be processed. Instead, they will be added to the build output directly without any modification.
Now, you have a general understanding of how this React app is structured. Let’s build and run it to see how it looks.
Build and Launch the App
Recall that package.json maintains the list of dependencies - all the packages we need to compile and bundle the application.
We can install these dependencies by running the npm install command:
Terminal
# Go in the app directory (which contains the package.json)
cd react-from-scratch
# Install all the dependencies required by the app
npm install
Here’s the typical output of the npm install command:
added 270 packages, and audited 271 packages in 16s
97 packages are looking for funding run
npm fundfor detailsfound 0 vulnerabilities
Next, start the local development server using the command npm run dev:
Terminal
# Start the local dev server
npm run dev
> react-from-scratch@0.0.0 dev > vite
VITE v5.0.10 ready in 139 ms
➜ Local: http://localhost:5173/ ➜ Network: use —host to expose ➜ press h + enter to show help
The server is up & running. Let’s hit the URL mentioned above (http://localhost:5173/):
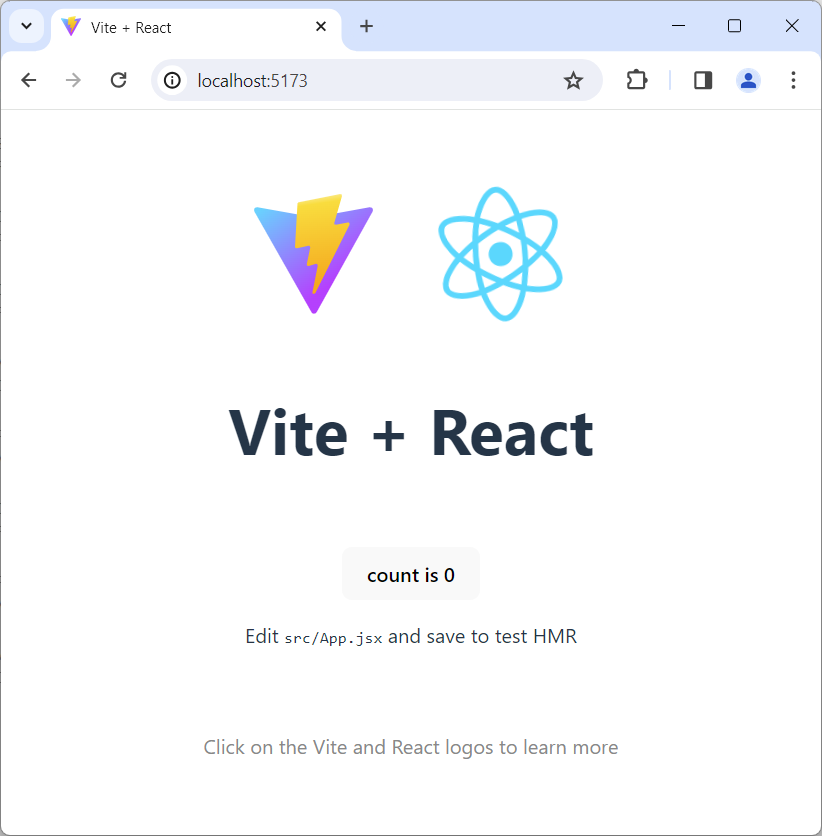
The application has loaded successfully. It loads the JSX content from the src/App.jsx we saw above.
Modify the App
The above screenshot shows the default application that Vite created out of the box. We can customize and make it our own!
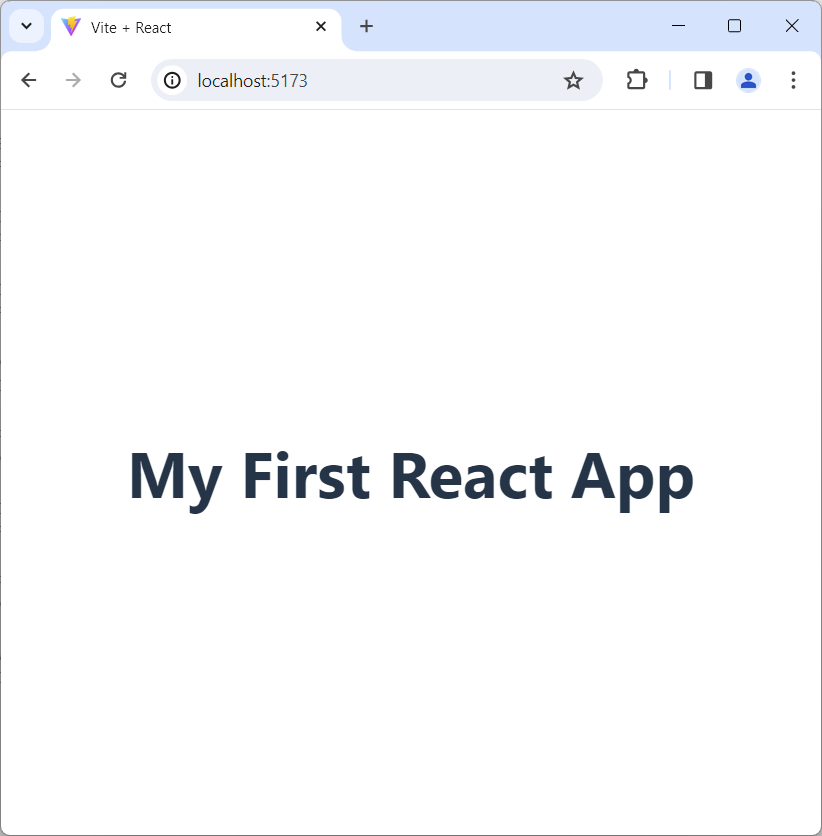
Let’s open the file src/App.jsx and replace its content with the below code, which returns a simple h1 element:
src/App.jsx
import "./App.css";

function App() {
  return (
    <>
      <h1>My First React App</h1>
    </>
  );
}

export default App;
Now, check the app in the browser. It will automatically update to reflect the changes:
Looks good. Let’s go one step further and write a component!
Create First Component
React can greatly simplify how we build web pages. It lets you create reusable building blocks called components. These components, like Lego pieces, can be combined to compose entire web pages.
Let’s see how we can do this in action.
We want to welcome visitors to our app with a customized greeting. Let’s create a new component that takes in a visitor’s name and renders a personalized welcome message.
To do so, we’ll create a new file, Greetings.jsx, in the src directory and add the below code, which defines a component as a function:
src/Greetings.jsx
// Define a new component as a function.
// The argument 'props' is a dictionary that
// contains the inputs to the component.
function Greetings(props) {
  return (
    //  Get visitor's name from 'props'
    // and render the welcome message
    <h2>Hello, {props.name}!</h2>
  );
}

export default Greetings;
Inputs to the components are called Props. React passes in a dictionary object called props containing all the inputs.
We’ll pass the visitor’s name as a prop. So we can access it in the JSX using {props.name}.
Use the Component
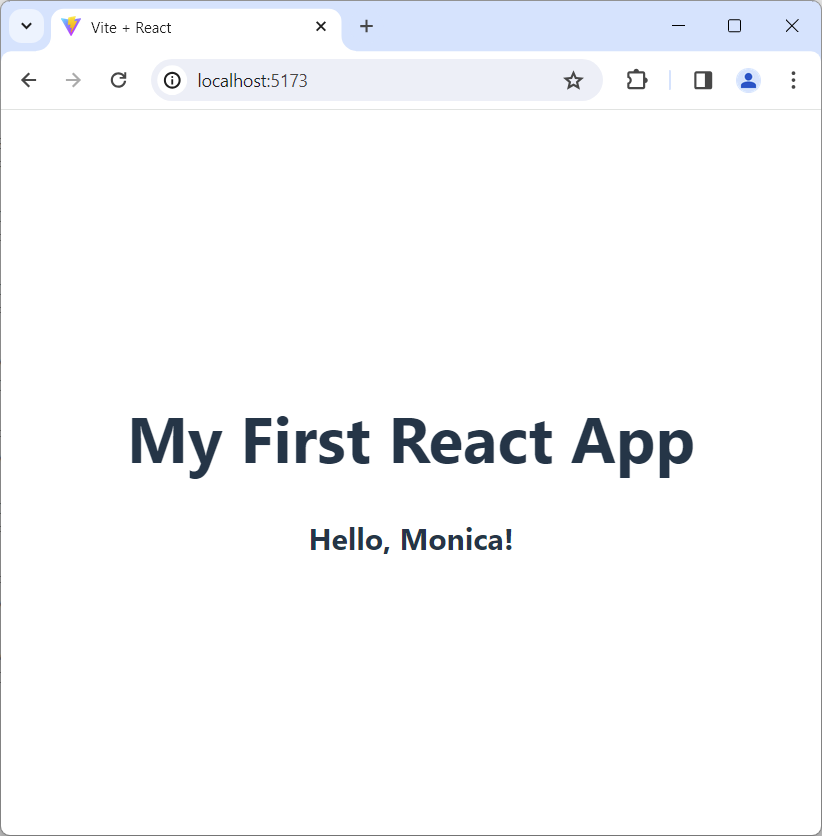
We’ve defined our component. Let’s put it to use to greet our first visitor!
We’ll import the component in src/App.jsx and add it to the returned JSX. Make sure to pass in the visitor’s name as a prop:
src/App.jsx
import "./App.css";
// import the Greetings component
import Greetings from "./Greetings.jsx";

function App() {
  return (
    <>
      <h1>My First React App</h1>
      {/* Add Greetings component &
      pass visitor's name as a prop */}
      <Greetings name="Monica" />
    </>
  );
}

export default App;Tip: Use {/* */} to wrap comments in the JSX code. The usual double slash, //, used in JavaScript won’t work.
Let’s check the browser. It’ll automatically update to show the greeting with the visitor’s name:
Reuse the Component
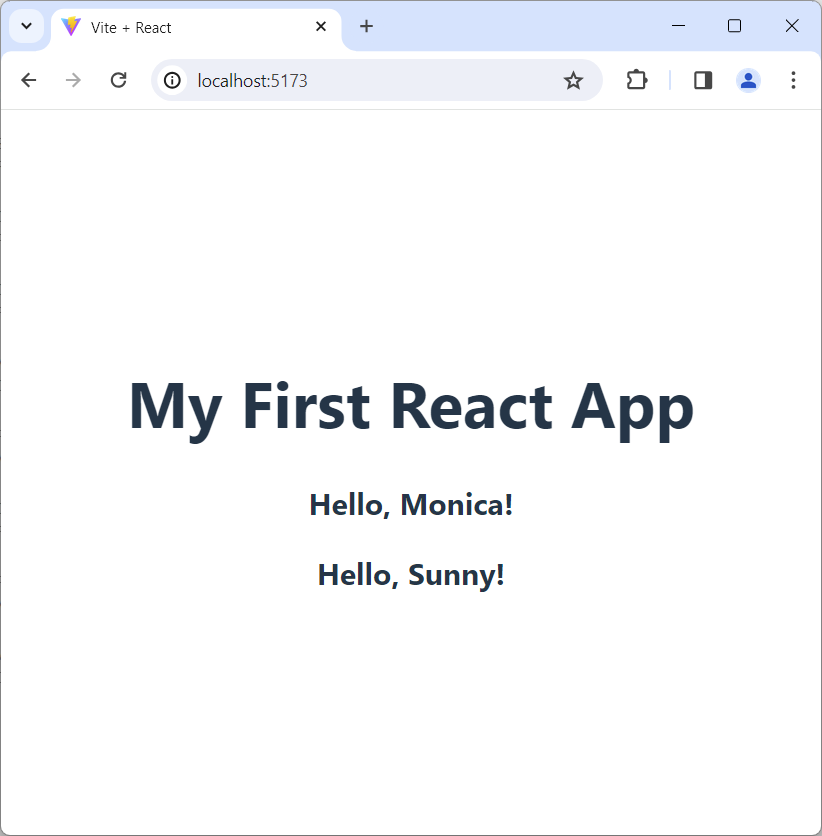
Let’s say you now want to greet your second visitor. We can reuse the Greetings component since we’ve already created it.
We’ll pass the second visitor’s name as a prop, and the component will render a customized greeting:
src/App.jsx
import "./App.css";
// import the Greetings component
import Greetings from "./Greetings.jsx";

function App() {
  return (
    <>
      <h1>My First React App</h1>
      {/* Add Greetings component &
       pass visitor's name as a prop */}
      <Greetings name="Monica" />
      {/* Reuse Greetings component to
      welcome the second visitor */}
      <Greetings name="Sunny" />
    </>
  );
}

export default App;
Now head to the browser, and voila! You’ll see customized greetings for both visitors:
React Developer Tools
So far, our app has only one component (or two, if you count src/App.jsx). However, as you add more features, the number of components may grow to dozens or even hundreds!
Debugging such an app could be tedious. That’s especially true if we render the same components multiple times with different props and internal states. How can we debug such complex applications if we face any issues?
Luckily, the official React team has created React Developer Tools, a browser extension available for Chrome, Edge, and Firefox.
Let’s install this extension. Once installed, here’s how you can launch it:
- Go to the browser tab where our app is loaded.
- Hit the F12 key to launch the standard browser developer tools.
- Finally, click on the “Components” tab:
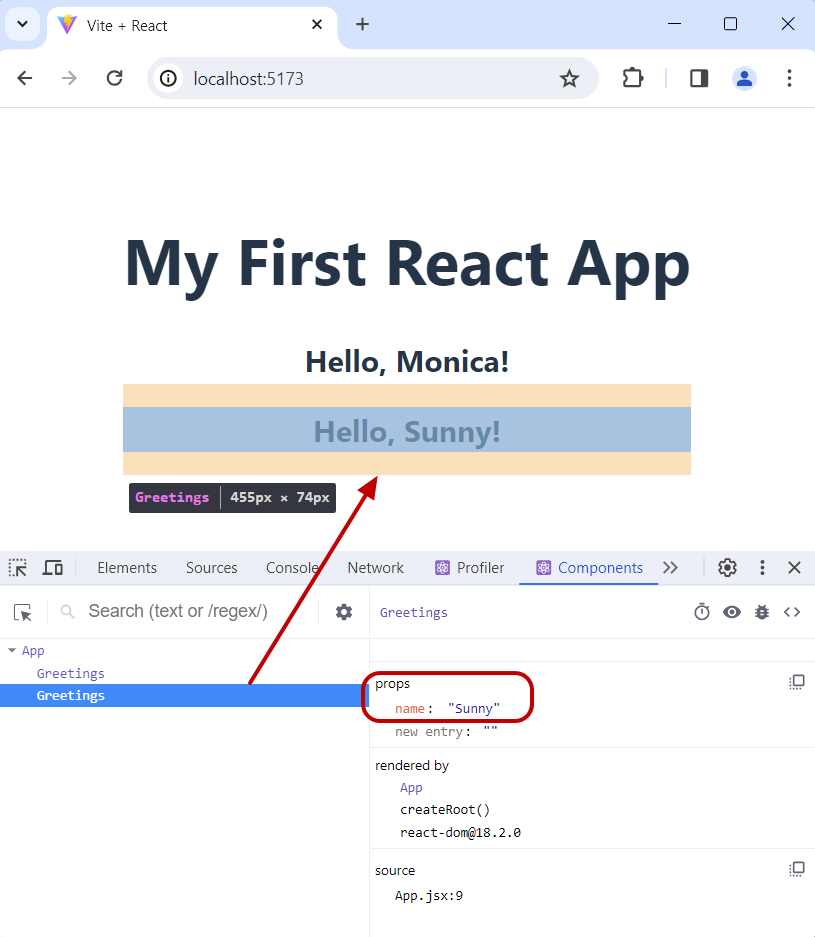
Here are some of the helpful features of React Developer Tool:
- It shows all the components and their hierarchy. As you see above, the left panel contains the App, the top component, and its children - the two Greetings components.
- When you click on a component, it’ll highlight the browser area where the component is rendered. E.g., the above screenshot highlights the second Greetings component in the browser window.
- The right panel shows the component’s props and state. You can even modify the prop values and see the change in the browser in real-time!
Summary & Next Steps
This tutorial is a practical guide for an absolute beginner to React. It showed you how to create a new React app from scratch and run it locally.
You also learned how to create and use components to compose a web page. I also introduced you to React Developer Tools, which you can use to debug React apps.
This is the first article in a tutorial series for React beginners. So stay tuned for the next article.
Ciao, until then!