· 11 minute read

How to Push Local Project to a New GitHub Repository
· · 7 minute read
Introduction
This tutorial walks you through a crucial step for a new programming project - how do you create a new GitHub repository and add your code to it?
I assume you already have a local project you want to push to GitHub. I’ll use the React application from the previous article for the demonstration.
Additionally, you’ll need a GitHub account. You can create one using the signup link if you don’t have it.
Now, let’s get started.
Setup Command Line Tools
Let’s install and configure two command line tools we’ll need today - Git & GitHub CLI.
Install & Configure Git Command
We’ll be using Git commands to interact with GitHub repositories. If you don’t have it installed yet, you can do so from the download page.
Once installed, set your username & email in Git as per the instructions here.
Install GitHub CLI & Authenticate with GitHub
You’ll need GitHub CLI to log in to GitHub from the command line. You can install it from its homepage.
Once installed, let’s use the GitHub CLI command gh auth login to authenticate with GitHub. Follow the prompts and choose to login with a web browser using HTTPS protocol, as shown below:
Terminal
# Authenticate with GitHub
gh auth login
? What account do you want to log into? GitHub.com
? What is your preferred protocol for Git operations? HTTPS
? Authenticate Git with your GitHub credentials? Yes
? How would you like to authenticate GitHub CLI? Login with a web browser! First copy your one-time code: 6060-D5E9 Press Enter to open github.com in your browser… ✓ Authentication complete. - gh config set -h github.com git_protocol https ✓ Configured git protocol ✓ Logged in as ysk125103
You should now be all set to interact with GitHub using the command line.
Inspect Your Local Project
Let’s go inside the top-level directory of the local project. In my case, it’ll be the directory containing the application react-from-scratch:
Terminal
# Go inside the project top-level directory
cd /home/learn/react/react-from-scratch

# List all the files and directories
# Use 'dir' instead of 'ls -l' for Windows
ls -l
total 24
-rw-rw-r-- 1 361 Jan 4 01:10 index.html
-rw-rw-r-- 1 663 Jan 4 01:10 package.json
drwxrwxr-x 2 4096 Jan 4 01:10 public
-rw-rw-r-- 1 451 Jan 4 01:10 README.md
drwxrwxr-x 3 4096 Jan 4 01:10 src
-rw-rw-r-- 1 163 Jan 4 01:10 vite.config.jsCurrently, the above code only exists on my local machine. We want to push it to GitHub.
Create a New GitHub Repository
Let’s go to the GitHub website. Log in using your GitHub credentials and then follow the below instructions:
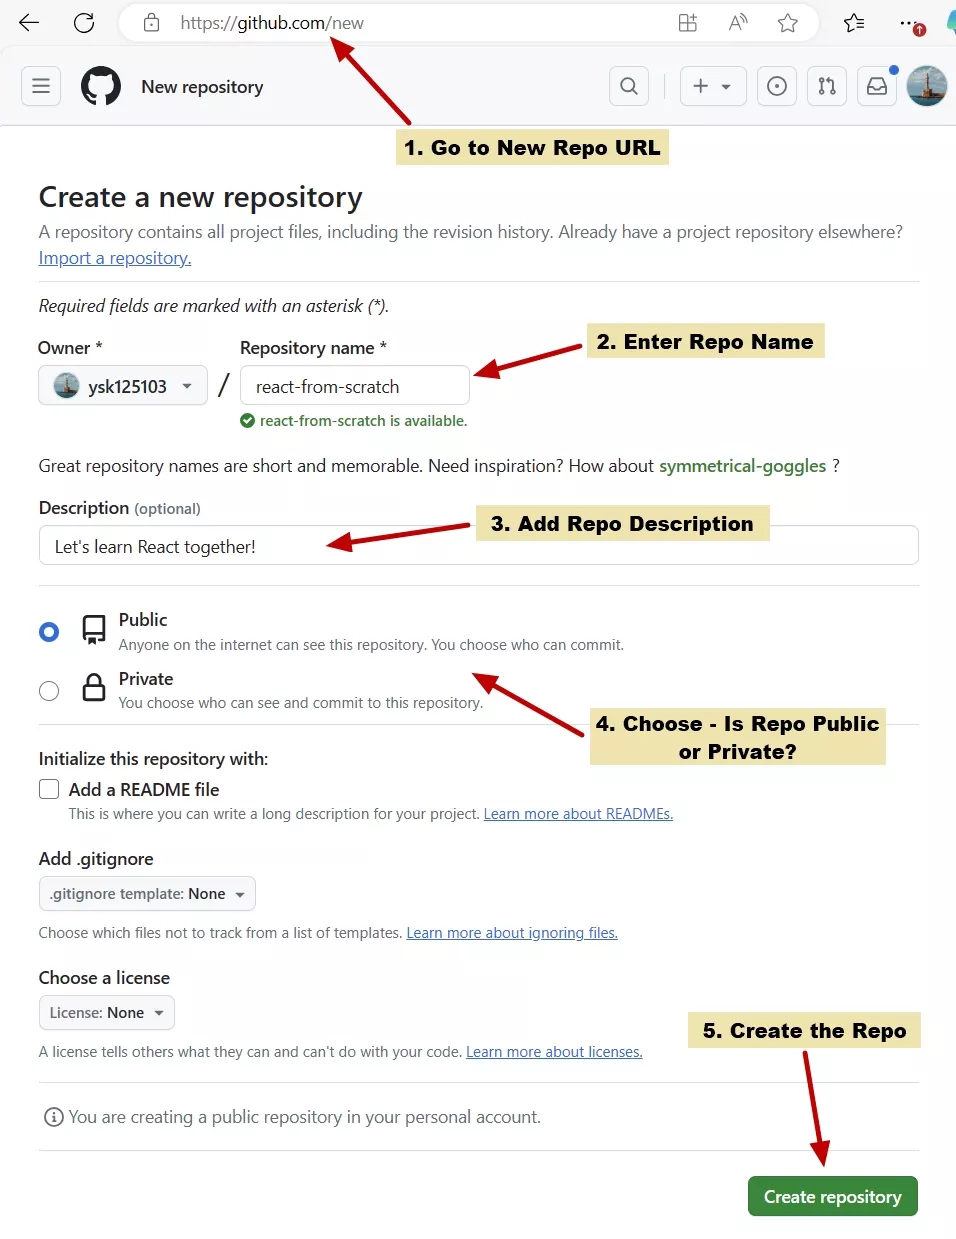
- Go to the new repository creation1 URL: https://github.com/new
- Enter the repository name. Usually, it’s the same as the top-level directory for your project. I’ll set it to
react-from-scratch. - Enter the description for your project.
- Set Privacy: Do you want your repository to be publicly available? If so, choose Public. Otherwise, select Private.
- Finally, click on the Create Repository button.
The below image highlights all of the above steps:
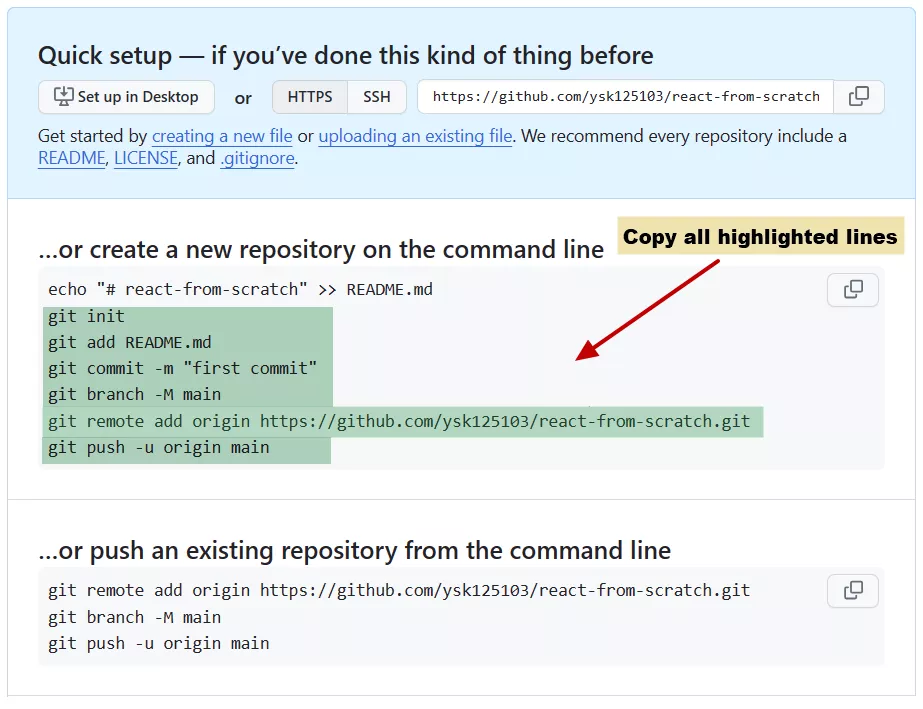
Once the new repository is created, GitHub will take you to a screen like the one below. Copy the highlighted git commands. We’ll use them in the next section.
Push Local Project to New Github Repo
We have the new GitHub repository ready. It’s empty, though. Let’s push our local project into it.
First, confirm that you’re in your project’s top-level directory:
Terminal
# Check the current directory
# You should be in the project's top-level directory
pwd/home/learn/react/react-from-scratchNow, let’s execute, with a slight variation, the commands copied in the previous section.
Step 1: Run the git init command to initialize the Git repository in the local project.
Terminal
# Initialize git repository
git init
Initialized empty Git repository in /home/learn/react/react-from-scratch/.git/
Step 2: Execute the git add * to add all the files from the local project to the local Git staging area.
Terminal
# Add all the files (using *) to the local Git staging area
git add *
Step 3: Use the git commit to commit all the files in the local Git staging area.
Terminal
# Commit all staged changes
# Add a helpful message using the -m option
git commit -m "first commit"[master (root-commit) f2297de] first commit
10 files changed, 211 insertions(+)
create mode 100644 README.md
create mode 100644 index.html
create mode 100644 package.json
create mode 100644 public/vite.svg
create mode 100644 src/App.css
create mode 100644 src/App.jsx
create mode 100644 src/assets/react.svg
create mode 100644 src/index.css
create mode 100644 src/main.jsx
create mode 100644 vite.config.jsStep 4: Run the git branch command to set main as the initial or default branch.
Terminal
# Change the branch to 'main'
git branch -M main
Step 5: Execute the git remote add command to connect to the remote GitHub repository we created in an earlier section.
Terminal
# Connect local repo to the remote GitHub repo
git remote add origin https://github.com/ysk125103/react-from-scratch.git
Step 6: Finally, use the git push command to upload the locally committed changes to the remote GitHub repository.
Terminal
# Upload the committed changes to the remote GitHub repo
git push -u origin main
Enumerating objects: 15, done.
Counting objects: 100% (15/15), done.
Delta compression using up to 8 threads
Compressing objects: 100% (13/13), done.
Writing objects: 100% (15/15), 5.79 KiB | 1.93 MiB/s, done.
Total 15 (delta 0), reused 0 (delta 0), pack-reused 0
To https://github.com/ysk125103/react-from-scratch.git
* [new branch] main -> main
Branch 'main' set up to track remote branch 'main' from 'origin'.Inspect the Remote Github Repository
At this point, the GitHub repository will contain all your changes. Let’s confirm by going to the repository in the browser:
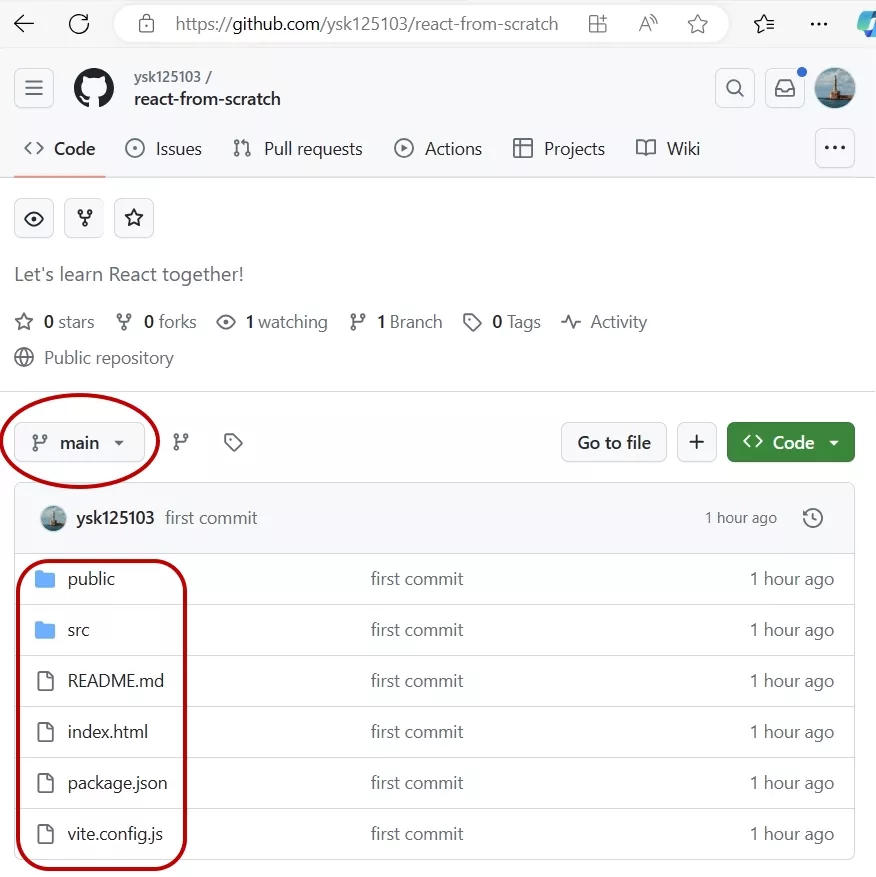
Looks good. The remote main branch now contains all the code from our local project.
Summary
Today, you learned an indispensable skill every developer should know - how to push your local project to a new GitHub repository.
Let’s recap the topics we covered. I showed you how to:
- Set up two essential command line tools - Git and GitHub CLI.
- Authenticate with GitHub from the command line.2
- Create a new GitHub repository.
- Use Git commands to upload your local project to the new GitHub repository.
That’s it for today. Happy coding!
Footnotes
-
There’s another way to go to the new repo creation screen: Click on your profile icon in the top right corner and go to the Your Repositories link. Then click on the New icon.
That’s too many steps. I prefer to use the direct link. ↩ -
Logging in to GitHub from the command line can be quite tricky. If you run into any issues, follow the instructions from the official documentation - Authenticating with GitHub from Git. ↩
Title Image by
StockSnap